
Let’s be real: drumsticks are confusing when you’re starting out.
5A? 7A? 2B? Nylon tips? Oak vs hickory vs maple?
When I first picked up a pair, I thought they were all the same. Well, they’re not.
The right pair can make your playing smoother, louder, and even prevent injury. The wrong ones? Pain, poor tone, and cracked cymbals (been there, sadly).
In this ultimate guide, I’ll walk you through how to choose drumsticks, understand what the numbers mean, and figure out which sticks are best for your style.
Whether you’re into jazz, metal, or just jamming at home – this guide will set you up for success.
Drumstick Basics: Anatomy, Sizes, and Types
Alright, so here’s the thing – they all look the same at first. When I first walked into a music store to buy my first pair of drumsticks, I legit thought I could just grab any pair.
I saw some 5As on the wall, thought “sure, sounds like a middle-of-the-road number,” and went on my way.
What I didn’t realize was that every single number, letter, and tiny detail actually meant something.
Let’s break it down, because understanding this stuff early on saved me a ton of frustration (and cash) later.
Anatomy of a drumstick
Every stick has a few parts: tip, shoulder, taper, shaft, and butt.
These aren’t just fancy words. Each part totally affects how the stick plays and feels.
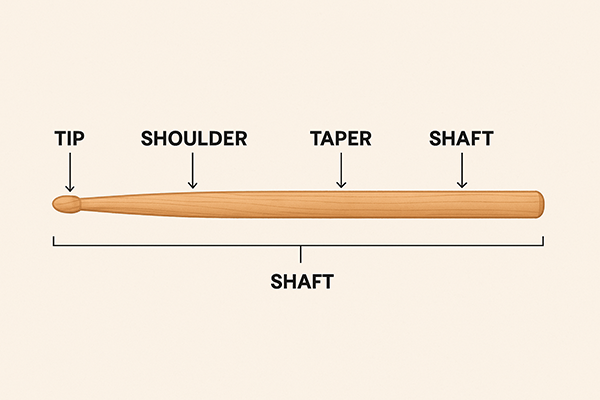
- Tip: That’s the part hitting your drum or cymbal. Different shapes (like round, barrel, teardrop, acorn) create different sounds, especially on cymbals.
- Shoulder: The bit just below the tip. It affects how much vibration you get and the response of the stick.
- Taper: This is how the stick narrows between the shoulder and the grip. A longer taper gives you more rebound; shorter = more power.
- Shaft: This is the main body of the stick. Its diameter determines how thick or thin the stick feels.
- Butt: Not gonna lie, I ignored this for years. But it matters! Some drummers flip the stick and play with the butt for heavier hits.
What Do 5A, 7A, and 2B Actually Mean?
This part confused the heck outta me in the beginning. Here’s the basic rule of thumb:
- The number refers to thickness. Lower numbers = thicker sticks.
- The letter originally referred to the intended style:
- A: Orchestra or softer playing
- B: Band (like concert bands)
- S: Street (marching)
- These days, most people just focus on how they feel, not what they were “meant” for.
For example:
- 5A = standard all-purpose stick. Great for most genres.
- 7A = thinner, lighter. Ideal for jazz, light playing, or smaller hands.
- 2B = thick and heavy. Often used in rock or by folks who want a louder punch.
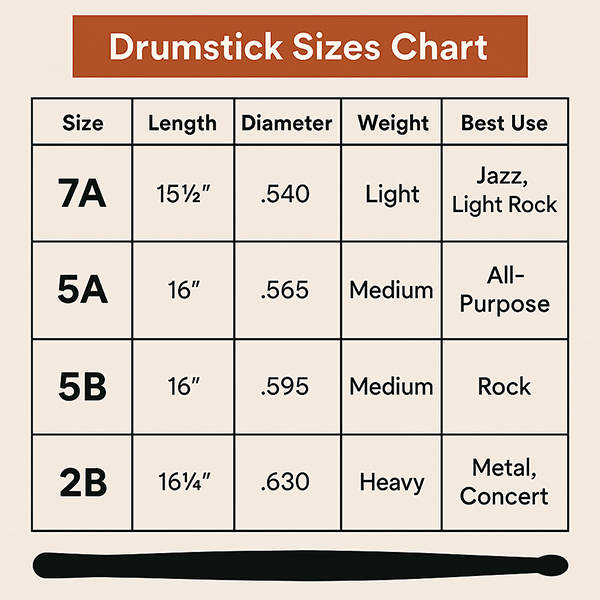
Check out our drumstick sizes chart to understand the differences and avoid the most common sizing mistake new drummers make.
Personally, I started on 5A and still use them. But I switched to 5B for a bit when I was playing more rock stuff. It helped cut through loud guitars without me breaking a sweat.
Tip Shapes: What They Sound Like
I didn’t realize how big a difference tip shape made until I switched from teardrop to acorn.
Suddenly my ride cymbal had way more clarity. Each tip shape hits cymbals and drums a little differently:
- Round: Bright, articulate cymbal tone
- Teardrop: Warm and versatile
- Barrel: Loud and punchy
- Acorn: Fat tone, especially on toms
- Oval: A good balance of tone and volume
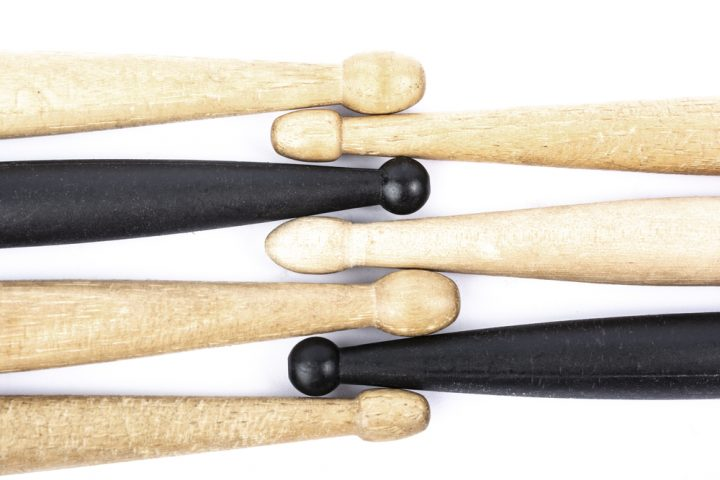
Also, wood tips sound warmer and more natural, while nylon tips last longer and give you more attack on cymbals.
I’ve broken more wood tips than I can count, but I still lean that way for sound.
Length, Diameter & Weight
Here’s something I didn’t realize until years in: even tiny differences in length or diameter can totally change how a stick feels.
Like, we’re talking 0.05″ being the difference between “whoa, I can fly on these” and “dang, these feel like tree trunks.”
- Longer sticks = more reach and leverage
- Thicker sticks = more volume, less finesse
- Heavier = more power, more fatigue
- Lighter = more speed, less impact
Sometimes I’ll keep two different stick sizes in my bag just in case I’m feeling sluggish or need to play quieter.
You can totally mix it up depending on the gig or mood.
How to Choose Drumsticks Based on Playing Style
Alright, let me tell you something I wish someone had drilled into my head early on – your playing style should absolutely shape your stick choice.
I used to think, “Eh, I’ll just get a standard 5A and call it a day.”
And while that’s not the worst starting point, once I started experimenting with different genres and stick sizes, my playing (and my hands!) thanked me big time.
Jazz, Worship, & Softer Styles – Go For Light
When I started dabbling in jazz, I grabbed a pair of 7A sticks on a whim. Game-changer.
They’re lighter and thinner, which meant I could move quicker around the kit, especially on the ride and hi-hat. My ghost notes came through way cleaner too.
For jazz, worship, acoustic, or ballad-type settings, you want:
- 7A or smaller sticks
- More finesse, less volume
- Better control on cymbals and delicate dynamics
Plus, your hands won’t feel like they did five rounds with a speed bag.
Rock, Punk, & Metal – You’ll Need Something Beefier
When I joined a punk band, I made the mistake of bringing those same 7As to our first rehearsal. Five minutes in – snap. I broke both sticks before the end of the set.
I switched to 5B or even 2B, and suddenly I could hit hard without feeling like I was overworking.
Thicker sticks = more weight = more power without you having to muscle every stroke.
For louder genres:
- Use thicker sticks like 5B or 2B
- Prioritize durability and volume
- Helps with rimshots and heavy snare work
Also, your cymbals will thank you when you’re not slicing through them with toothpicks.
All-Around & Beginners – Stick With Versatile Sizes
If you’re just getting started or play a little of everything, 5A is your best friend. I call it the “denim jeans of drumsticks.” Works with almost anything.
Great for:
- Learning basic technique
- Jamming across genres
- Balancing power and control
It’s also the most common size, so you’ll always find replacements easily.
Gospel, Funk, R&B – Speed + Dynamics = Choose Wisely
These genres live in the nuance. Fast hi-hat patterns, ghost notes, quick fills – all of that demands a stick that feels like an extension of your hand.
Some gospel drummers use custom signature sticks with tapered tips and unique balance points. I’ve played with 5A and even 8D in funk settings just to stay light and fast.
For groove-heavy styles:
- Lighter or mid-weight sticks with good rebound
- Teardrop or acorn tips for tone control
- Grippy finishes help with sweaty hands mid-set
Pro Tip: Rotate Stick Sizes Based on the Gig
These days, I keep atleast three pairs in my stick bag:
- 5A for general use
- 7A for quieter sets or jazz gigs
- 5B when I know things are gonna get loud
Don’t feel like you’re stuck with one type forever. Drummers who adapt stick choice to the music usually end up with better control, less fatigue, and honestly – fewer broken sticks.
Bottom line? Your sticks should match your style and not the other way around.
Try a few sizes, pay attention to how your hands and tone feel, and don’t be afraid to switch it up as you grow.
Next up: we’re getting into stick materials and why maple, hickory, and oak all hit a little different.
Stick Materials: Maple, Hickory, Oak, and Synthetics
Also this was one of those things I completely overlooked when I started.
I used to pick sticks based on size alone, but then I started wondering why did some break faster, or feel more “dead” in my hands?
Turns out, the wood matters. A lot.
Let’s talk about the big three (and a couple extras), because each one totally changes how the stick feels, plays, and survives life on your snare.
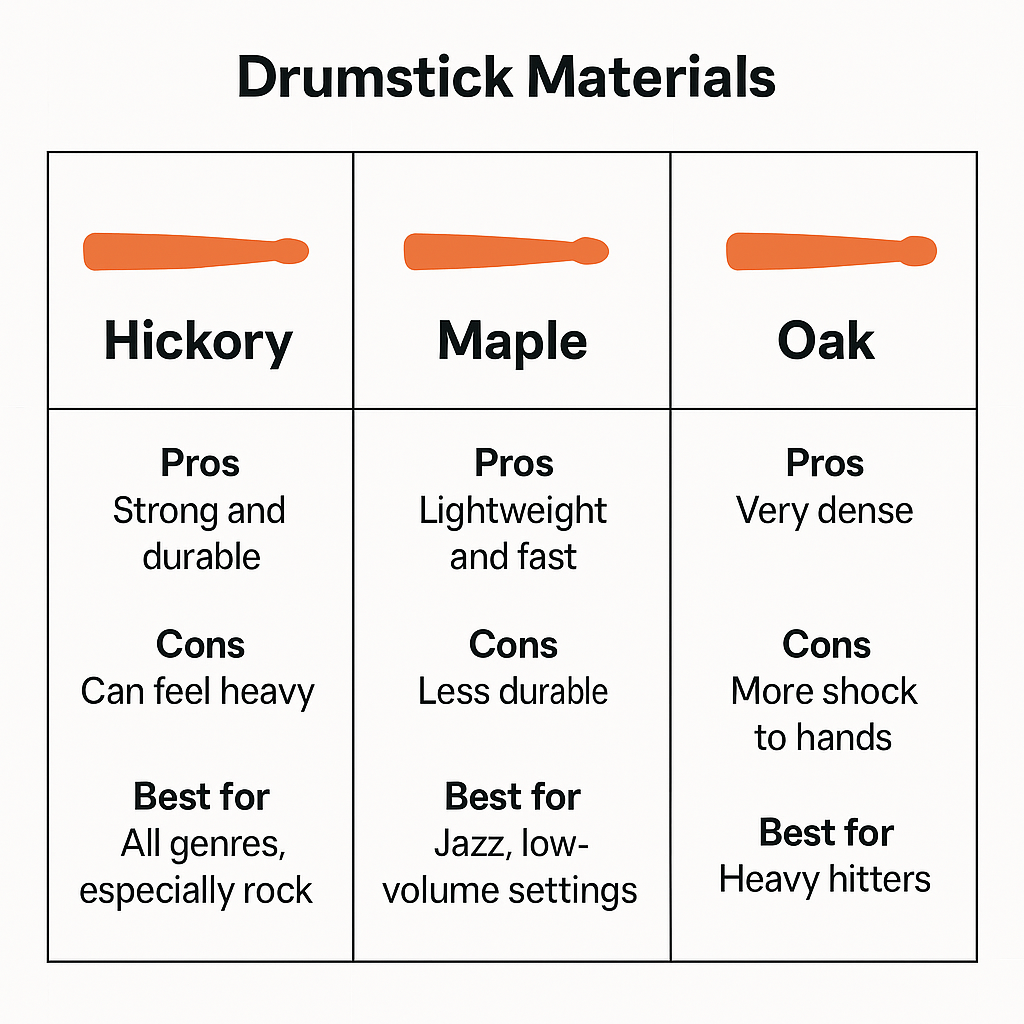
Hickory – The Gold Standard
If you asked 10 drummers what wood their go-to sticks are made from, I’d bet at least 7 would say hickory.
Why? Because it’s got that perfect balance of:
- Durability (doesn’t chip or break too quickly)
- Flexibility (absorbs shock well)
- Weight (not too light, not too heavy)
I used hickory for years without even knowing it. It’s the most common material for a reason.
It just feels right under your hands. Especially solid for rock, pop, and general use.
Maple – Light, Fast, But Fragile
I switched to maple for a jazz set once, and it was like I’d put turbo boosters on my hands.
Lighter sticks let you move quicker, but there’s a trade-off: they break like paper.
Maple is:
- Lightweight, great for fast playing
- Softer wood = less durable
- Better for finesse than force
If you’re doing light acoustic gigs, jazz, or playing on a practice pad for extended periods, maple is super easy on the hands.
Just don’t expect them to last forever.
Oak – Heavy Hitters Only
Okay, so oak sticks are tanks. I used a pair of oak 2Bs once for a metal show, and I felt like I could break cinder blocks with them. (My hands were not happy the next day though.)
Oak sticks:
- Are heavier and denser than hickory
- Last longer but are less forgiving on your wrists
- Great for super loud, aggressive playing
If you need max volume or are constantly breaking sticks, oak is a strong choice.
Just be ready for the extra fatigue if you’re not used to the weight. The vibations also comeback to your wrists – be ready for it…
Carbon Fiber & Synthetic Sticks – The New Kids on the Block
So I tried a pair of carbon fiber sticks after a buddy swore by them. They’re definitely cool tech-wise, some brands even claim they last 10x longer than wood. And they might do.
Pros:
- Ridiculously durable
- Consistent weight and feel
- Great rebound
But… they don’t feel exactly like wood. It’s kind of like trading your favorite wooden pencil for a mechanical one. Some love them, some say it feels “too artificial.”
I also have a separate article about carbon fiber drumsticks in depth if you are interested.
Synthetic sticks are awesome for:
- Practice pads (they won’t dent or break)
- Touring drummers who want longevity
- Anyone sick of buying sticks monthly
Your choice of stick material is a big part of your sound and your comfort. Try each type out.
See what feels right. And don’t be afraid to mix it up based on what you’re playing.
Next up: let’s talk wood tips vs nylon tips, because that tiny piece at the end? Yeah, it can make a big difference in your tone.
Wood Tip vs Nylon Tip Drumsticks
I used to think the tip of the stick was just… well, a tip. No big deal, right? I mean, how much can that little part really change your sound?
Spoiler: a lot. The tip is the only part that actually touches your drums and cymbals (unless you’re flipping sticks or breaking stuff), so yeah, it does matter.
Let me break down the real-world differences I’ve experienced between wood and nylon tips, and how I decide which to use.
Wood Tips – Warm, Natural, and Classic
Wood tips are by far the most common, and for good reason. They just feel right – they are natural, warm, organic. They give you that familiar tone, especially on cymbals.
Here’s what I’ve noticed with wood tips:
- Softer attack on cymbals – less “ping,” more wash
- Better tone for jazz, funk, and acoustic styles
- They wear down over time, especially with aggressive playing
- More prone to chipping (and once they’re chipped? Game over)
I remember playing with a pair of wood tips on a super trashy crash cymbal… man, the tone was buttery.
But once the tip splintered mid-song, that buttery sound turned to mush. I learned to always keep a backup pair handy.
Nylon Tips – Bright, Precise, and Long-Lasting
My first time using nylon tips was actually a total accident. I bought a pair online, didn’t realize they were nylon, and thought something was wrong with my cymbals during soundcheck.
That ping? Wildly bright.
But after a few shows, I actually started to love it, especially in live settings where I wanted clarity.
Nylon tips:
- Give you more attack and brighter cymbal tones
- Are more durable, really great for outdoor gigs or marching band
- Don’t chip like wood tips do
- Can feel a little “slappy” on drums (some say synthetic-sounding)
They’re perfect for styles like:
- Metal and rock where you want to cut through guitars
- Latin percussion with lots of cymbal work
- Any situation where weather or moisture might mess with wood
My Take – It’s All About the Gig
These days, I switch based on what I’m doing:
- Wood tips for jazz gigs, warm studio sessions, or funk sets
- Nylon tips when I’m playing outside, on harsh cymbals, or want that crisp articulation
There’s no “right” answer. I’ve even seen guys bring one of each to a gig and switch mid-set depending on the tune (kinda wild, but hey, it works).
One Thing to Watch For…
Cheap nylon tips sometimes pop off. Yup.
I had one fly across the room once mid-fill. Not ideal. Stick with quality brands like Vic Firth or Promark and you’ll be fine.
Final word? Try both. Play the same groove on your ride cymbal with a wood tip, then a nylon tip. You’ll hear the difference. You might even feel it in your hands.
Alright, next up: we’re getting into how your setup affects your stick choice – because yeah, your drumsticks shouldn’t just match your style, but your gear too.
How to Choose Drumsticks for Different Setups and Situations
Okay, so here’s where things get really practical. Because picking the right stick isn’t just about genre or experience – it’s also about where and what you’re playing.
I didn’t realize how much the setup mattered until I started bouncing between acoustic kits, electronics, marching gear, and practice pads.

Suddenly, the sticks I loved in one context felt totally off in another. If you’ve ever felt like “these just don’t work today,” it might not be you, it might be your setup.
Practice Pads – Lighter or Heavier? Depends on the Goal
Let me tell you, if you’re doing a lot of pad work (especially with a low-rebound pad), your choice of stick can either help you build chops or wreck your wrists.
I used to use my regular 5As on a dead pad and wonder why my hands felt like they’d aged 20 years.
Try this instead:
- Use heavier sticks (like marching sticks) to build endurance
- Or use lighter sticks to work on finesse and technique
- Bonus: heavier sticks on pads make your regular sticks feel like feathers when you hit the kit
Electronic Kits – You Need Control, Not Volume
So here’s a mistake I made early on: I brought heavy oak sticks to an electronic drum gig.
My rebound was awful, I was overshooting pads, and worst of all – I was crazy loud through the trigger sensitivity.
For e-kits:
- Go for lighter sticks with shorter taper for control
- Consider nylon tips to prevent early mesh head wear
- Avoid massive sticks – they mess with dynamics and pad response
Pro tip: 5A or 7A with nylon tips work great for most modules.
Acoustic Kits – Match the Room and the Genre
This is where most of us live, and honestly, this is where you need options. Playing a jazz gig in a coffee shop?
Don’t bring 2Bs unless you want death stares from the barista. Playing outdoors with no mics? Bring the thunder.
- Small venues / low-volume sets: 7A or lighter sticks, sometimes even rods or brushes
- Medium rooms / standard sets: 5A, 5B depending on feel and genre
- Outdoor gigs or no-mic shows: 2B, oak sticks, anything durable
I keep all three in my bag and choose depending on the room, not just the music.
Marching Band & Corps – A Whole Different Beast
Marching sticks are beefy. If you’ve ever picked up a pair of Vic Firth MS1s, you know.
These are meant for projection, articulation, and consistency – usually on Kevlar heads, which feel nothing like a standard snare.
Marching sticks:
- Are heavier, thicker, and more front-loaded
- Demand different hand positioning and rebound control
- Can seriously help with building muscle and stamina on pads
I sometimes warm up with a pair just to work out the hands before switching to my “normal” sticks.
Orchestral, Percussion Ensembles & Mallet Instruments
In these settings, it’s not just about size, it’s about the sound you want.
Often you’re using:
- Specialty sticks like concert snare sticks (shorter, more balanced)
- Mallets, brushes, or rods depending on the instrument
- Non-standard grips like traditional grip for concert snare work
These environments are precise, so stick selection usually comes down to tone color and volume needs.
Always Bring a Backup Option!
Here’s what I’ve learned the hard way: bring at least two pairs of different sticks to every session or gig. I can not stress enough how important is to have backup.
I’ve had:
- Unexpected volume changes mid-set
- Cymbals that just didn’t respond well to a certain tip
- A stick crack in the first 30 seconds
Being able to switch from a 5A to a 7A (or nylon tip to wood) instantly saved my sound more times than I can count.
Stick choice isn’t just about you, it’s about your setup, your gear, your environment.
The right pair for your practice pad might not work on stage. So be smart, stay flexible, and build a little stick toolkit that covers all your bases.
Next up: we’ll compare top drumstick brands and popular models – because yes, the brand does matter more than people think.
Top Drumstick Brands and Popular Models
The brand you choose can affect feel, consistency, durability, balance, and even how much you trust your gear on stage.
I’ve played shows with off-brand sticks that felt fine but snapped halfway through the second song.
I’ve also had signature sticks I loved so much I hoarded backups like they were going out of production (because… they did).
Here’s what I’ve learned over the years:
Vic Firth – The Industry Standard

Vic Firth is like the Fender of drumsticks, I believe everybody’s used them, and for good reason. They’re super consistent, well-balanced, and widely available.
What I love about Vic Firth:
- Extremely reliable manufacturing: sticks feel identical from pair to pair
- Great for all skill levels
- Massive selection: from 5A to signature series to marching sticks
Top models:
- 5A – Your everyday, all-purpose stick
- American Classic 7A – A lighter touch for jazz and soft gigs
- Dave Weckl Evolution – Balanced and great for fast, technical players
If you’re new to drumming and don’t know where to start, Vic Firth 5As are the gold standard.
Promark – Quality with a Slightly Different Feel

Promark sticks tend to feel a little tighter and more focused, at least in my hands. They also offer a lot of eco-conscious and innovative designs.
Cool Promark features:
- ActiveGrip coating – it gets tackier the more you sweat
- FireGrain sticks – heat-tempered hickory for extra durability
- Made in the USA with very tight specs
Popular picks:
- Rebound 5A – For finesse and fast play
- Forward 5B – More front-heavy for powerful players
- Mike Portnoy Signature – Great for progressive and metal drummers
I use their FireGrain 5As when I want sticks that just won’t break.
Vater – Under the Radar but Built Like Tanks
Vater flies a little under the radar, but man… these sticks last. I used a pair of Vater 5Bs on a three-month run and they outlived two pairs of my usuals.
Why I dig Vater:
- Heavier feel with strong balance
- Often more durable than comparable models from other brands
- Comfortable finishes and grippy texture
Fan-favorite models:
- Fusion – Slightly longer than a 5A, with great response
- Los Angeles 5A – Nice all-rounder with great feel
- Chris Adler Signature – Absolute unit of a stick if you’re into metal
Zildjian – Better Known for Cymbals, But Their Sticks Hold Up

I used to avoid Zildjian sticks because I thought, “Eh, they make cymbals, not sticks.” But after trying their Anti-Vibe series, I realized I was missing out.
What stands out:
- Anti-Vibe tech – absorbs shock, which helps if you’ve got wrist pain or tendonitis
- Lighter feel overall
- Smooth lacquer that isn’t too slippery
Worth trying:
- Anti-Vibe 5A or 5B
- Travis Barker Signature – Iconic and punchy
- Dennis Chambers Signature – Great balance and precision
Signature Sticks – Cool or Gimmick?
Let’s be real: half the time, signature sticks are more about branding than performance.
But some are actually fantastic sticks regardless of the artist name.
Here’s what to ask yourself:
- Does the stick match my style, or am I just buying it because it has someone’s name on it?
- Are the specs actually unique, or is it just a 5A with a cool logo?
- Do I need the extra length, weight, or taper that signature sticks sometimes offer?
That said, I’ve fallen in love with the Dave Weckl and Steve Gadd models. Not because I play like them, but because the sticks just honestly feel great.
Budget vs Premium – Does Price Equal Quality?
You don’t need to drop $20 on a pair of sticks when you’re starting out. In fact, I recommend sticking with basic 5As or 5Bs until you know what you’re looking for.
But here’s the thing: cheap sticks break faster. They’re often made from lower-grade wood and inconsistent in balance.
Spending a few extra bucks on a name-brand, hickory stick is 100% worth it. You’ll get:
- Better durability
- Consistent feel
- More enjoyable practice and playing sessions
Wrap-up tip? Once you find a brand and model you love – just stick with it. But don’t be afraid to try new ones occasionally.
You might be surprised by how much a tiny shift in taper or diameter can inspire new ideas on the kit.
Alright, coming up next: how to test, buy, and take care of your sticks – because your gear deserves a little TLC too.
Tips for Testing, Buying, and Maintaining Drumsticks
This is the part that no one tells you but honestly should. Because once you’ve found the perfect pair of sticks, the last thing you want is to blow money on duds or have them snap during your second chorus.
Let’s talk about what to look for before you buy, how to get the most mileage out of your sticks, and what to do when they start to wear out.
How to Test Drumsticks in a Store
First time I walked into a music shop, I was so awkward about testing sticks I just tapped them on my shoe and walked out. Don’t do that.
Here’s how to properly test drumsticks:
- Roll them on a flat surface (like a drum head or counter): if they wobble, they’re warped. Put ’em back.
- Tap them gently on a pad or surface: listen for pitch. If one sounds higher than the other, they’re mismatched.
- Feel the weight in each hand: they should be evenly balanced. If one feels heavier, keep looking.
I like to grab three or four pairs of the same model and find the pair that feels exactly the same.
It takes an extra minute, but trust me – your hands will notice the difference.
Where to Buy Drumsticks
You’ve got two solid options: local music stores and online retailers. Both have pros and cons.
Local store pros:
- You can test sticks before buying
- Immediate purchase – no shipping delay
- You’re supporting small businesses (bonus!)
Online store pros:
- Bigger selection (especially for signature or rare models)
- Sometimes cheaper, especially in bulk
- Great for reordering sticks you already know you love
That said – don’t buy off-brand sticks just because they’re $3 cheaper on Amazon. You’ll spend more replacing them.
Trusted online spots:
- Sweetwater
- Drum Center of Portsmouth
- Thomann (for Europe)
- Musician’s Friend
- Reverb (for used deals or bundles)
Maintenance Tips – Make Your Sticks Last
I used to go through sticks like guitarists go through picks… until I realized I was kinda abusing them.
Here’s how I make my sticks last way longer now:
- Rotate your sticks every few songs. Helps them wear evenly.
- Avoid rimshots on cracked sticks: they can break mid-stroke (and that’s dangerous).
- Wipe them down if your hands sweat a lot. Moisture weakens wood over time.
- Store them in a stick bag: not floating loose in your backpack.
- Don’t play with chipped tips. They sound bad and shred your cymbals.
Also, don’t be afraid to retire a pair if the tips are worn flat or if the balance feels off. You’ll play better and sound better.
When to Replace Drumsticks
This one took me too long to figure out. I kept playing sticks that were basically kindling because I thought I was saving money. Bad idea.
Here are signs it’s time to toss a pair:
- Tip is chipped or flattened
- Stick is warped (roll it to check)
- One feels heavier than the other
- You’re getting weird, uneven tones off the ride or snare
- Splinters. Just… no.
Bonus tip: I write the purchase date on a small strip of tape at the butt of my stick. Helps me track how long they’ve lasted and which pairs hold up better.
Bottom line? Taking care of your sticks is just as important as choosing them.
A little bit of testing, smart buying, and basic maintenance goes a long way. Your wallet and your wrists will thank you.
Final Thoughts on Choosing Drumsticks Like a Pro
Let’s be honest: drumsticks don’t get enough credit. They’re the only thing connecting your hands to your sound, and yet most of us just grab whatever’s lying around when we’re starting out. Been there, done that.
But here’s the truth: when you find the right pair, something clicks. Your hands feel more relaxed. Your playing gets tighter. Your tone sharpens up. You’re not fighting the kit anymore – you’re finally playing with it.
So let’s recap the big takeaways:
- Anatomy matters. Know your tip from your butt (literally). It all affects your sound.
- Pick sticks based on your style. Jazz? Go light. Metal? Go big.
- Material makes a difference. Maple’s light, oak’s tough, hickory’s the sweet spot.
- Tips matter more than you think. Wood is warm, nylon is bright. Try both.
- Adapt to your setup. Pads, e-kits, acoustic gigs – they all have different needs.
- Brands aren’t just marketing. Quality control really varies.
- Take care of your sticks. Rotate, wipe, retire when needed.
If there’s one piece of advice I wish I’d heard earlier, it’s this: experiment. Don’t get stuck in a 5A comfort zone just because “everyone else uses them.”
Try new weights. Test weird tip shapes. Buy a different brand now and then.
You’ll be amazed at how much inspiration can come from something as simple as switching sticks.
Stick with it (pun intended), and you’ll master how to choose drumsticks that fit your needs.


